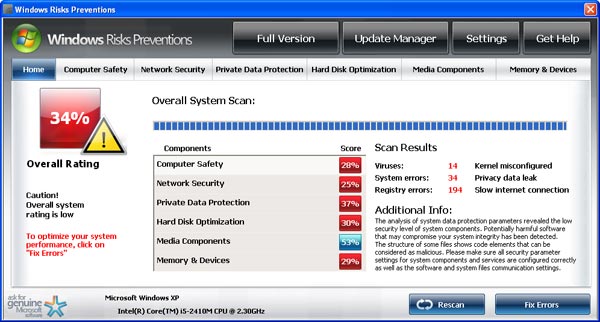
1. What is Windows Risks Preventions?
Windows Risks Preventions is fake anti-spyware program, obsessively demanding user to purchase the license in order to remove viruses that have been supposedly detected while performing illusory computer scan. The program belongs to the same family as Windows Saviour Firewall, Windows Accidents Prevention, Windows Anticrashes Utility, Windows Troubles Solver, Windows Custom Settings, Windows Necessary Firewall, Windows Firewall Unit, Windows Profile System, Windows Precautions Center, Windows Repairing System.
Windows Risks Preventions will not allow displaying normal desktop, imposing that computer is infected and needs to be cleaned. Windows Risks Preventions will start computer scan every time Windows operating system is started. After the scan has been completed, fake scan results will be generated, stating that numerous viruses, system errors and registry errors have been detected. All notifications delivered by Windows Risks Preventions are inaccurate and should be disregarded.
Windows Risks Preventions is illegal anti-spyware software and is used to scare and deceive user. Do not make any payments requested by this program. Use Windows Risks Preventions removal guide instead.
2. Windows Risks Preventions screen shot:
3. How to remove Windows Risks Preventions:
- Internet connection might be disabled or Internet browser might be blocked by Windows Risks Preventions, so it won't be possible to download any files to infected computer. In this case please download all files required for Windows Risks Preventions removal to another computer and then transfer them on the infected one using CD/DVD or USB flash drive.
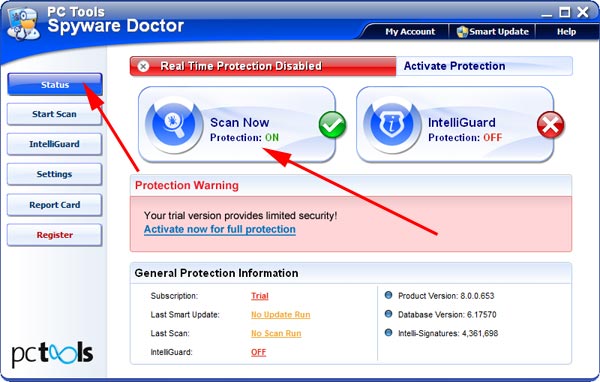
- To remove Windows Risks Preventions download Spyware Doctor and install the program (for the installation guide click here). Before installation, make sure all other programs and windows are closed.
-
After the installation, computer scan should be started automatically. If so, please move to the next step. If not, click "Status" on the left side menu and press "Scan Now" button to run computer scanner as shown in the picture below:
-
After the scan has been completed and scan results have been generated, press "Fix Checked" button to remove Windows Risks Preventions.

- Restart the computer to complete Windows Risks Preventions removal procedure.